Updated on September 12, 2022
The welcome message is the initial message presented to the user, and it establishes a brief line of communication by assisting the user in connecting with the business and encouraging their participation.
A chatbot greeting message is an excellent way to make a positive first impression on new or returning customers. These statements can not only provide a good first impression, but they may also enable dialogues and make clients feel at ease while navigating a website.
When building any bot, the primary aim is to engage the user in a meaningful conversation. One of the best ways to achieve this goal is to ensure that from the moment the user first logs in, they understand your bot’s main purpose and capabilities, the reason why your bot was created. Depending on where the user begins the chat, this article explains how to set up distinct welcome messages using the Kompose bot to help you, welcome users to your bot.
At Kommunicate, we make it easy to create a welcome message with our Kompose Bot Builder.
Kompose is a GUI bot builder based on natural language conversations for human-computer interaction. You don’t need to have any coding skills to master Kompose. It has a simple, intuitive and user-friendly interface. If you haven’t built your bot yet, you can refer to our article on “How to create a chatbot” and start developing one.
To set up different welcome messages in Kompose, please follow the below instructions.
Suggested Read: Best Whatsapp Away Messages template You Can Use for (Almost) Every Occasion
Step 1: Go to the Bot integrations section
First, you need to login into your Kommunicate dashboard. If you do not have a Kommunicate account, you can sign up for free.
Navigate to the ‘Bot Integration‘ under the “Bot Integrations” section click “Create a bot with Kompose( Chatbot Builder)”.
In the ‘Bot profile’ page, Set up your Bot by providing Bot Name & Language then ‘Save and proceed
Once saved, it will be navigating to the next page ‘Human handoff’, enable or disable the “Automatic bot to human handoff:” setting, and click the ‘Finish bot setup’ button.
Step 2: Go to the kompose section
After the bot setup is done, go to the Kompose section in the Bot Integration section. Select your bot from the ‘Select bot’ dropdown list.
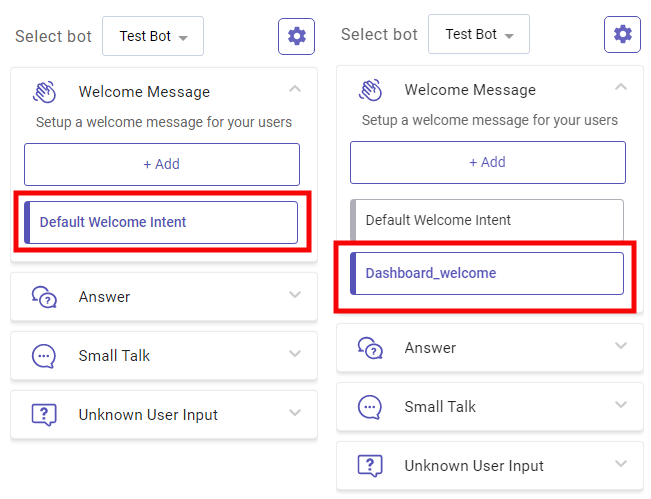
Step 3: Create a welcome message for your chatbot
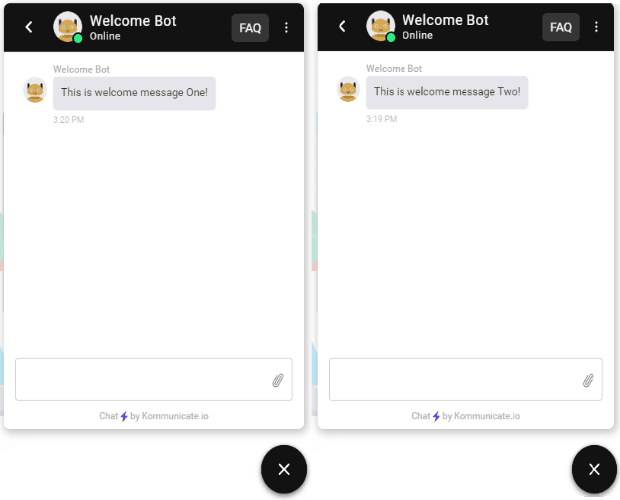
One of the first things you do is set up your greeting message for your chatbot. Click on the default Default welcome Intent to create your first welcome message, and Add button to create multiple welcome messages and this message will prompt the bot to greet the customer with the first greeting.
Step 4: Add the URL path in the path section
The website URL path can be defined in the path section along with conditions given, this was
All paths where the bot has been integrated and matches any of the conditions will display the following welcome message.
Note: Please enter the pathname without the domain.
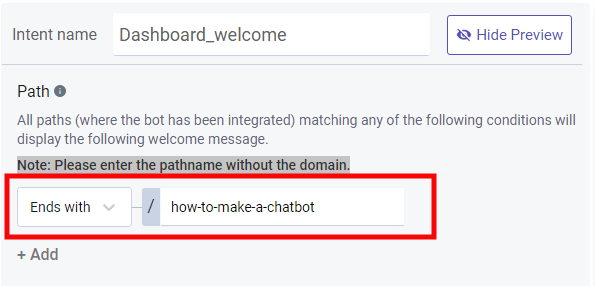
These are the conditions that can be set to the path URL so that the particular welcome message will be displayed depending on where the bot is integrated
- Starts with
- Ends with
- Contains
- Equals
Now save the change and can be previewed on your website or on the kommunicate dashboard
AtAt Kommunicate, we are envisioning a world-beating customer support solution to empower the new era of customer support. We would love to have you on board to have a first-hand experience of Kommunicate. You can signup here and start delighting your customers right away.

")