AWS Machine Learning Blog
Build ML features at scale with Amazon SageMaker Feature Store using data from Amazon Redshift
Amazon Redshift is the most popular cloud data warehouse that is used by tens of thousands of customers to analyze exabytes of data every day. Many practitioners are extending these Redshift datasets at scale for machine learning (ML) using Amazon SageMaker, a fully managed ML service, with requirements to develop features offline in a code way or low-code/no-code way, store featured data from Amazon Redshift, and make this happen at scale in a production environment.
In this post, we show you three options to prepare Redshift source data at scale in SageMaker, including loading data from Amazon Redshift, performing feature engineering, and ingesting features into Amazon SageMaker Feature Store:
- Option A – Use an AWS Glue interactive session on Amazon SageMaker Studio (in a dev environment) and an AWS Glue job (in a prod environment) with Spark
- Option B – Use an Amazon SageMaker Processing job with a Redshift dataset definition, or use SageMaker Feature Processing in SageMaker Feature Store, which runs SageMaker training jobs
- Option C – Use Amazon SageMaker Data Wrangler in a low-code/no-code way
If you’re an AWS Glue user and would like to do the process interactively, consider option A. If you’re familiar with SageMaker and writing Spark code, option B could be your choice. If you want to do the process in a low-code/no-code way, you can follow option C.
Amazon Redshift uses SQL to analyze structured and semi-structured data across data warehouses, operational databases, and data lakes, using AWS-designed hardware and ML to deliver the best price-performance at any scale.
SageMaker Studio is the first fully integrated development environment (IDE) for ML. It provides a single web-based visual interface where you can perform all ML development steps, including preparing data and building, training, and deploying models.
AWS Glue is a serverless data integration service that makes it easy to discover, prepare, and combine data for analytics, ML, and application development. AWS Glue enables you to seamlessly collect, transform, cleanse, and prepare data for storage in your data lakes and data pipelines using a variety of capabilities, including built-in transforms.
Solution overview
The following diagram illustrates the solution architecture for each option.

Prerequisites
To continue with the examples in this post, you need to create the required AWS resources. To do this, we provide an AWS CloudFormation template to create a stack that contains the resources. When you create the stack, AWS creates a number of resources in your account:
- A SageMaker domain, which includes an associated Amazon Elastic File System (Amazon EFS) volume
- A list of authorized users and a variety of security, application, policy, and Amazon Virtual Private Cloud (Amazon VPC) configurations
- A Redshift cluster
- A Redshift secret
- An AWS Glue connection for Amazon Redshift
- An AWS Lambda function to set up required resources, execution roles and policies
Make sure that you don’t have already two SageMaker Studio domains in the Region where you’re running the CloudFormation template. This is the maximum allowed number of domains in each supported Region.
Deploy the CloudFormation template
Complete the following steps to deploy the CloudFormation template:
- Save the CloudFormation template sm-redshift-demo-vpc-cfn-v1.yaml locally.
- On the AWS CloudFormation console, choose Create stack.
- For Prepare template, select Template is ready.
- For Template source, select Upload a template file.
- Choose Choose File and navigate to the location on your computer where the CloudFormation template was downloaded and choose the file.
- Enter a stack name, such as
Demo-Redshift. - On the Configure stack options page, leave everything as default and choose Next.
- On the Review page, select I acknowledge that AWS CloudFormation might create IAM resources with custom names and choose Create stack.
You should see a new CloudFormation stack with the name Demo-Redshift being created. Wait for the status of the stack to be CREATE_COMPLETE (approximately 7 minutes) before moving on. You can navigate to the stack’s Resources tab to check what AWS resources were created.
Launch SageMaker Studio
Complete the following steps to launch your SageMaker Studio domain:
- On the SageMaker console, choose Domains in the navigation pane.
- Choose the domain you created as part of the CloudFormation stack (
SageMakerDemoDomain). - Choose Launch and Studio.
This page can take 1–2 minutes to load when you access SageMaker Studio for the first time, after which you’ll be redirected to a Home tab.
Download the GitHub repository
Complete the following steps to download the GitHub repo:
- In the SageMaker notebook, on the File menu, choose New and Terminal.
- In the terminal, enter the following command:
You can now see the amazon-sagemaker-featurestore-redshift-integration folder in navigation pane of SageMaker Studio.
Set up batch ingestion with the Spark connector
Complete the following steps to set up batch ingestion:
- In SageMaker Studio, open the notebook 1-uploadJar.ipynb under
amazon-sagemaker-featurestore-redshift-integration. - If you are prompted to choose a kernel, choose Data Science as the image and Python 3 as the kernel, then choose Select.
- For the following notebooks, choose the same image and kernel except the AWS Glue Interactive Sessions notebook (4a).
- Run the cells by pressing Shift+Enter in each of the cells.
While the code runs, an asterisk (*) appears between the square brackets. When the code is finished running, the * will be replaced with numbers. This action is also workable for all other notebooks.
Set up the schema and load data to Amazon Redshift
The next step is to set up the schema and load data from Amazon Simple Storage Service (Amazon S3) to Amazon Redshift. To do so, run the notebook 2-loadredshiftdata.ipynb.
Create feature stores in SageMaker Feature Store
To create your feature stores, run the notebook 3-createFeatureStore.ipynb.
Perform feature engineering and ingest features into SageMaker Feature Store
In this section, we present the steps for all three options to perform feature engineering and ingest processed features into SageMaker Feature Store.
Option A: Use SageMaker Studio with a serverless AWS Glue interactive session
Complete the following steps for option A:
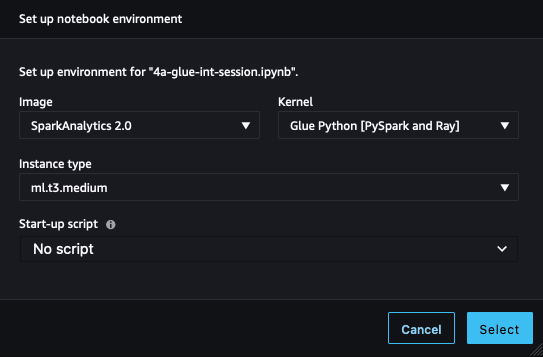
- In SageMaker Studio, open the notebook 4a-glue-int-session.ipynb.
- If you are prompted to choose a kernel, choose SparkAnalytics 2.0 as the image and Glue Python [PySpark and Ray] as the kernel, then choose Select.
The environment preparation process may take some time to complete.
Option B: Use a SageMaker Processing job with Spark
In this option, we use a SageMaker Processing job with a Spark script to load the original dataset from Amazon Redshift, perform feature engineering, and ingest the data into SageMaker Feature Store. To do so, open the notebook 4b-processing-rs-to-fs.ipynb in your SageMaker Studio environment.
Here we use RedshiftDatasetDefinition to retrieve the dataset from the Redshift cluster. RedshiftDatasetDefinition is one type of input of the processing job, which provides a simple interface for practitioners to configure Redshift connection-related parameters such as identifier, database, table, query string, and more. You can easily establish your Redshift connection using RedshiftDatasetDefinition without maintaining a connection full time. We also use the SageMaker Feature Store Spark connector library in the processing job to connect to SageMaker Feature Store in a distributed environment. With this Spark connector, you can easily ingest data to the feature group’s online and offline store from a Spark DataFrame. Also, this connector contains the functionality to automatically load feature definitions to help with creating feature groups. Above all, this solution offers you a native Spark way to implement an end-to-end data pipeline from Amazon Redshift to SageMaker. You can perform any feature engineering in a Spark context and ingest final features into SageMaker Feature Store in just one Spark project.
To use the SageMaker Feature Store Spark connector, we extend a pre-built SageMaker Spark container with sagemaker-feature-store-pyspark installed. In the Spark script, use the system executable command to run pip install, install this library in your local environment, and get the local path of the JAR file dependency. In the processing job API, provide this path to the parameter of submit_jars to the node of the Spark cluster that the processing job creates.
In the Spark script for the processing job, we first read the original dataset files from Amazon S3, which temporarily stores the unloaded dataset from Amazon Redshift as a medium. Then we perform feature engineering in a Spark way and use feature_store_pyspark to ingest data into the offline feature store.
For the processing job, we provide a ProcessingInput with a redshift_dataset_definition. Here we build a structure according to the interface, providing Redshift connection-related configurations. You can use query_string to filter your dataset by SQL and unload it to Amazon S3. See the following code:
You need to wait 6–7 minutes for each processing job including USER, PLACE, and RATING datasets.
For more details about SageMaker Processing jobs, refer to Process data.
For SageMaker native solutions for feature processing from Amazon Redshift, you can also use Feature Processing in SageMaker Feature Store, which is for underlying infrastructure including provisioning the compute environments and creating and maintaining SageMaker pipelines to load and ingest data. You can only focus on your feature processor definitions that include transformation functions, the source of Amazon Redshift, and the sink of SageMaker Feature Store. The scheduling, job management, and other workloads in production are managed by SageMaker. Feature Processor pipelines are SageMaker pipelines, so the standard monitoring mechanisms and integrations are available.
Option C: Use SageMaker Data Wrangler
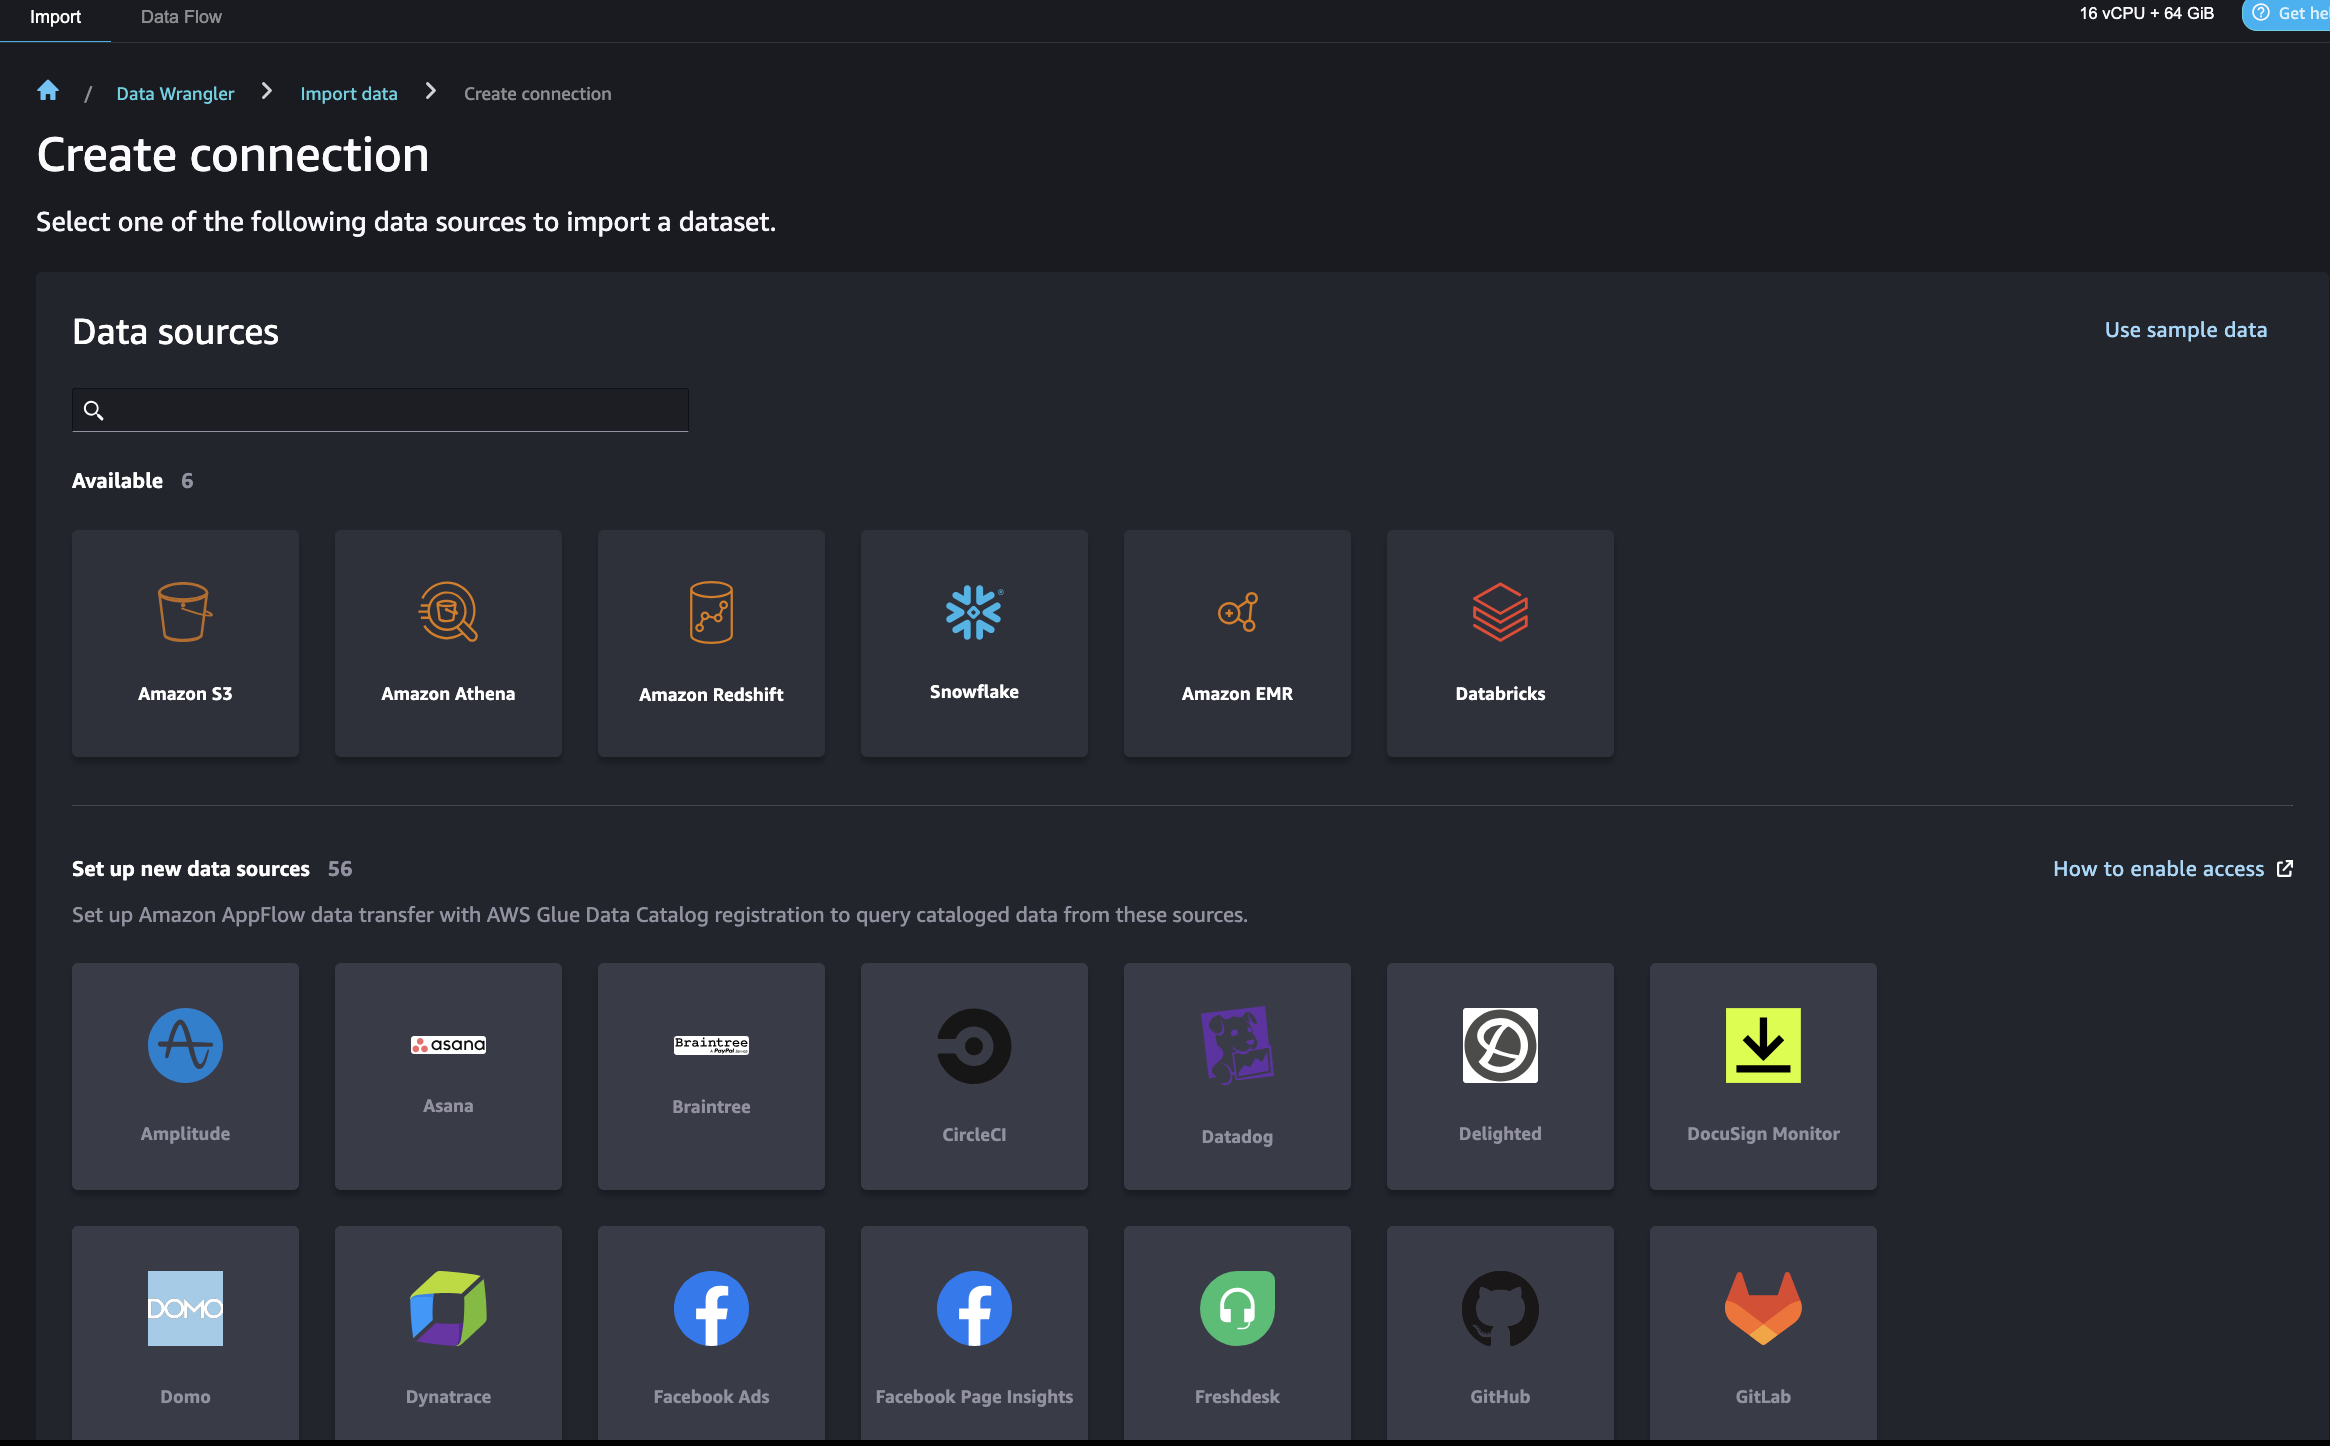
SageMaker Data Wrangler allows you to import data from various data sources including Amazon Redshift for a low-code/no-code way to prepare, transform, and featurize your data. After you finish data preparation, you can use SageMaker Data Wrangler to export features to SageMaker Feature Store.
There are some AWS Identity and Access Management (IAM) settings that allow SageMaker Data Wrangler to connect to Amazon Redshift. First, create an IAM role (for example, redshift-s3-dw-connect) that includes an Amazon S3 access policy. For this post, we attached the AmazonS3FullAccess policy to the IAM role. If you have restrictions of accessing a specified S3 bucket, you can define it in the Amazon S3 access policy. We attached the IAM role to the Redshift cluster that we created earlier. Next, create a policy for SageMaker to access Amazon Redshift by getting its cluster credentials, and attach the policy to the SageMaker IAM role. The policy looks like the following code:
After this setup, SageMaker Data Wrangler allows you to query Amazon Redshift and output the results into an S3 bucket. For instructions to connect to a Redshift cluster and query and import data from Amazon Redshift to SageMaker Data Wrangler, refer to Import data from Amazon Redshift.
SageMaker Data Wrangler offers a selection of over 300 pre-built data transformations for common use cases such as deleting duplicate rows, imputing missing data, one-hot encoding, and handling time series data. You can also add custom transformations in pandas or PySpark. In our example, we applied some transformations such as drop column, data type enforcement, and ordinal encoding to the data.
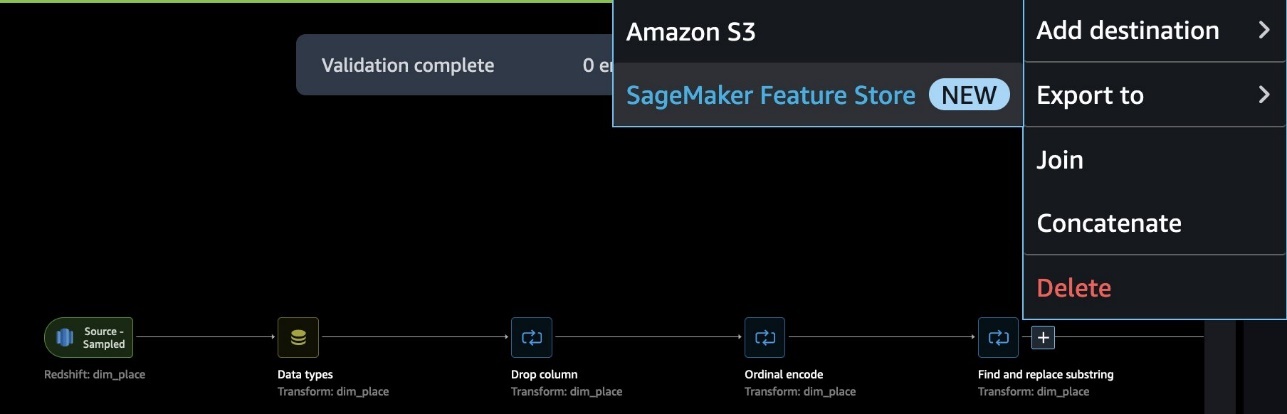
When your data flow is complete, you can export it to SageMaker Feature Store. At this point, you need to create a feature group: give the feature group a name, select both online and offline storage, provide the name of a S3 bucket to use for the offline store, and provide a role that has SageMaker Feature Store access. Finally, you can create a job, which creates a SageMaker Processing job that runs the SageMaker Data Wrangler flow to ingest features from the Redshift data source to your feature group.

Here is one end-to-end data flow in the scenario of PLACE feature engineering.
Use SageMaker Feature Store for model training and prediction
To use SageMaker Feature store for model training and prediction, open the notebook 5-classification-using-feature-groups.ipynb.
After the Redshift data is transformed into features and ingested into SageMaker Feature Store, the features are available for search and discovery across teams of data scientists responsible for many independent ML models and use cases. These teams can use the features for modeling without having to rebuild or rerun feature engineering pipelines. Feature groups are managed and scaled independently, and can be reused and joined together regardless of the upstream data source.
The next step is to build ML models using features selected from one or multiple feature groups. You decide which feature groups to use for your models. There are two options to create an ML dataset from feature groups, both utilizing the SageMaker Python SDK:
- Use the SageMaker Feature Store DatasetBuilder API – The SageMaker Feature Store
DatasetBuilderAPI allows data scientists create ML datasets from one or more feature groups in the offline store. You can use the API to create a dataset from a single or multiple feature groups, and output it as a CSV file or a pandas DataFrame. See the following example code:
- Run SQL queries using the athena_query function in the FeatureGroup API – Another option is to use the auto-built AWS Glue Data Catalog for the FeatureGroup API. The FeatureGroup API includes an
Athena_queryfunction that creates an AthenaQuery instance to run user-defined SQL query strings. Then you run the Athena query and organize the query result into a pandas DataFrame. This option allows you to specify more complicated SQL queries to extract information from a feature group. See the following example code:
Next, we can merge the queried data from different feature groups into our final dataset for model training and testing. For this post, we use batch transform for model inference. Batch transform allows you to get model inferene on a bulk of data in Amazon S3, and its inference result is stored in Amazon S3 as well. For details on model training and inference, refer to the notebook 5-classification-using-feature-groups.ipynb.
Run a join query on prediction results in Amazon Redshift
Lastly, we query the inference result and join it with original user profiles in Amazon Redshift. To do this, we use Amazon Redshift Spectrum to join batch prediction results in Amazon S3 with the original Redshift data. For details, refer to the notebook run 6-read-results-in-redshift.ipynb.
Clean up
In this section, we provide the steps to clean up the resources created as part of this post to avoid ongoing charges.
Shut down SageMaker Apps
Complete the following steps to shut down your resources:
- In SageMaker Studio, on the File menu, choose Shut Down.
- In the Shutdown confirmation dialog, choose Shutdown All to proceed.

- After you get the “Server stopped” message, you can close this tab.
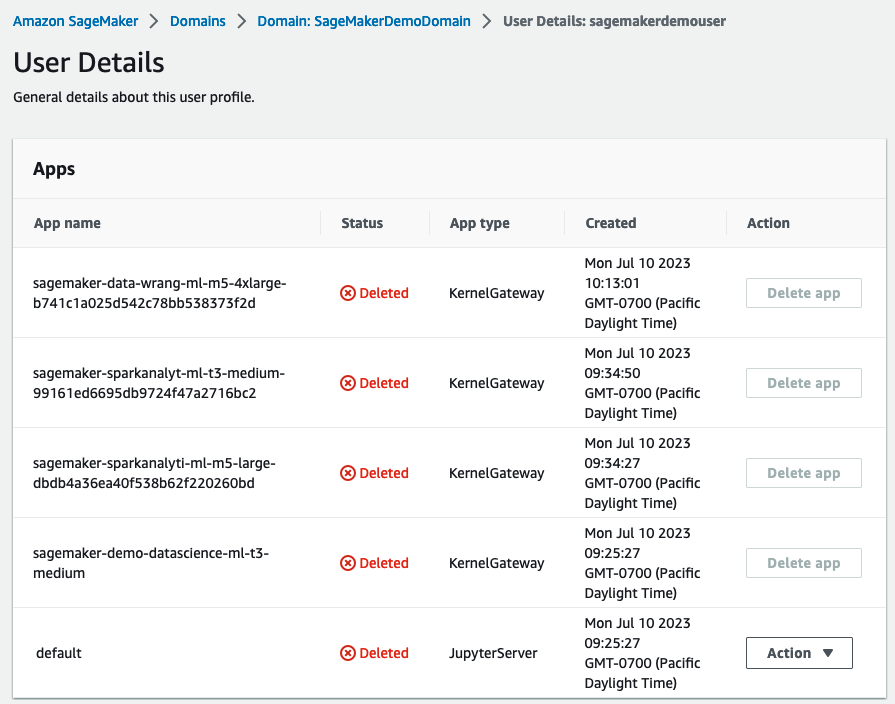
Delete the apps
Complete the following steps to delete your apps:
- On the SageMaker console, in the navigation pane, choose Domains.
- On the Domains page, choose
SageMakerDemoDomain. - On the domain details page, under User profiles, choose the user
sagemakerdemouser. - In the Apps section, in the Action column, choose Delete app for any active apps.
- Ensure that the Status column says Deleted for all the apps.
Delete the EFS storage volume associated with your SageMaker domain
Locate your EFS volume on the SageMaker console and delete it. For instructions, refer to Manage Your Amazon EFS Storage Volume in SageMaker Studio.
Delete default S3 buckets for SageMaker
Delete the default S3 buckets (sagemaker-<region-code>-<acct-id>) for SageMaker If you are not using SageMaker in that Region.
Delete the CloudFormation stack
Delete the CloudFormation stack in your AWS account so as to clean up all related resources.
Conclusion
In this post, we demonstrated an end-to-end data and ML flow from a Redshift data warehouse to SageMaker. You can easily use AWS native integration of purpose-built engines to go through the data journey seamlessly. Check out the AWS Blog for more practices about building ML features from a modern data warehouse.
About the Authors
 Akhilesh Dube, a Senior Analytics Solutions Architect at AWS, possesses more than two decades of expertise in working with databases and analytics products. His primary role involves collaborating with enterprise clients to design robust data analytics solutions while offering comprehensive technical guidance on a wide range of AWS Analytics and AI/ML services.
 Ren Guo is a Senior Data Specialist Solutions Architect in the domains of generative AI, analytics, and traditional AI/ML at AWS, Greater China Region.
 Sherry Ding is a Senior AI/ML Specialist Solutions Architect. She has extensive experience in machine learning with a PhD degree in Computer Science. She mainly works with Public Sector customers on various AI/ML-related business challenges, helping them accelerate their machine learning journey on the AWS Cloud. When not helping customers, she enjoys outdoor activities.
 Mark Roy is a Principal Machine Learning Architect for AWS, helping customers design and build AI/ML solutions. Mark’s work covers a wide range of ML use cases, with a primary interest in computer vision, deep learning, and scaling ML across the enterprise. He has helped companies in many industries, including insurance, financial services, media and entertainment, healthcare, utilities, and manufacturing. Mark holds six AWS Certifications, including the ML Specialty Certification. Prior to joining AWS, Mark was an architect, developer, and technology leader for over 25 years, including 19 years in financial services.